Introduction
In Part 1 , we demonstrated how Terraform can streamline reproducible security configurations. In this follow-up, I’ll show how to extend those principles across AWS, Azure, and GCP using Cloudflare Zero Trust. You’ll see how the project’s modular structure, automation, and dynamic routing reduce manual security tasks by up to 80%—based on my own benchmarks.
What’s new since Part 1:
- Custom subnets and improved network segmentation
- Automated device profiles and dynamic WARP routing
- Expanded multi-cloud support with updated diagrams
- Terraform code is now 4100+ lines of code, 87 files and 21 directories (even if the quantity does not mean quality!) with 143 resources
Let’s dive into the updated architecture and key modules powering this environment.
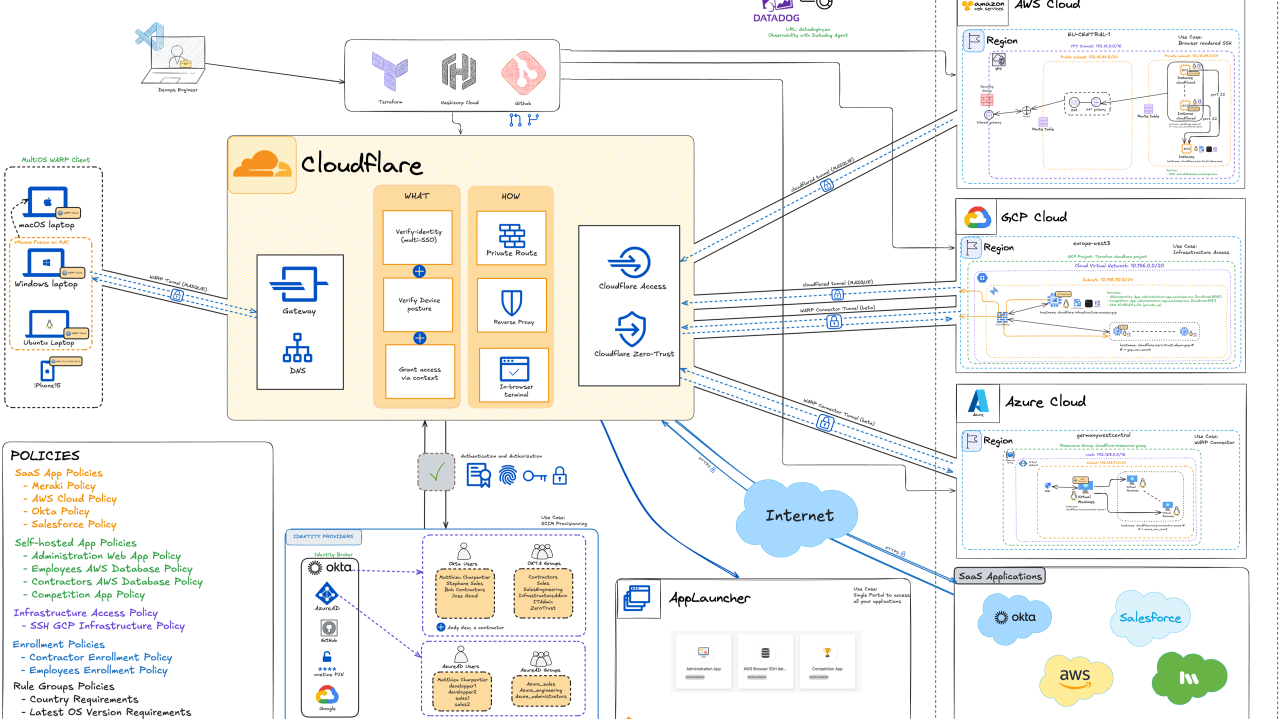
Architecture Breakdown

Key Components
- Automation and code versioning: Github, Terraform and VSCode
- Cross-cloud tunnel setups: GCP, AWS and Azure
- Multi-OS Cloudflare Agent setup: Cloudflare WARP
- Identity provider configurations: Okta, Azure AD (Entra ID) and Google
- Cloudflare Zero-trust Platform
- Security Policies: centralized management including posture, group membership, etc…
- SaaS app integrations (Meraki, Salesforce, etc…)
- Access App: Cloudflare AppLauncher
- Observability: Datadog
The setup integrates automation (GitHub, Terraform), cross-cloud tunnels (AWS, Azure, GCP), multi-OS Cloudflare WARP agents, multiple identity providers (Okta, Azure AD, Google), centralized security policies, SaaS app integrations, Cloudflare AppLauncher, and observability with Datadog.
Now that we have a high-level sense of what components are part of the project, let us delve into the code.
Project Structure Overview
A robust automation project demands not just effective code, but a clear, maintainable structure. From the outset, this Terraform repository was designed for modularity, reusability, and collaboration across teams.
| |
Why This Structure?
- Separation of Concerns: Each cloud provider and major function (identity, networking, security) is isolated in its own module. This keeps codebases clean, reduces merge conflicts, and accelerates onboarding for new contributors.
- Reusability: Modules can be reused across environments (dev, staging, prod) or even in other projects, simply by adjusting variables and wiring.
- Scalability: As the environment grows-adding more SaaS integrations, tunnels, or regions-the structure supports incremental change without major refactoring.
- Documentation-Driven: The /doc directory contains up-to-date architecture diagrams and dependency graphs, ensuring that the “why” behind each component is as accessible as the “how.” (contains excalidraw diagram as well as mermaid graph)
N.B.: I have decided to focus this blog post on two modules, namely cloudflare module and warp-routing modules and also talk a bit about the VM creation because they are at the heart of the project for the first one and the second one is a neat way to deal with routing (more on that later)
Before initializing your Terraform project, you need a good way to store the different API keys that we are going to be using.
Environment variables
All the API keys and secret are stored in environment variable. More over, I am using direnv to have environment variables pertaining to this particular project loaded when I browse to the project folder. It is a very neat way to declutter your .profile.
Advantages of using environment variables
- Avoids Hardcoding Sensitive Data: Storing API keys directly in Terraform configuration files or version control exposes them to anyone with access to those files. Environment variables keep secrets out of source code, reducing the risk of accidental leaks.
- Obfuscation: Environment variables help obfuscate sensitive values, making it harder for unauthorized users to access API keys just by reading configuration files.
- Integration with CI/CD: Environment variables are easily managed in continuous integration and deployment pipelines, where secrets can be injected securely at runtime without being stored in code repositories.
- Terraform Variable Precedence: Terraform supports passing variable values through environment variables using the TF_VAR_ prefix (e.g., TF_VAR_api_key). This method is prioritized after CLI arguments and .tfvars files, but before prompting the user, making it a robust and convenient option for secret injection.
- Seamless Environment Switching: Environment variables allow you to easily switch between development, staging, and production environments without modifying configuration files or maintaining separate versions for each environment.
| |
Key Take-aways
- All sensitive API keys and secrets are stored as environment variables, managed via direnv for project-specific loading.
- This approach avoids hardcoding secrets, integrates well with CI/CD, supports seamless environment switching, and leverages Terraform’s variable precedence for secure secret injection.
Now that we have our environment variables defined, let’s see how we programmatically declare our workloads (VMs).
VM Creation: Secure provisioning across Cloud
This section details how VMs are securely provisioned in AWS, Azure, and GCP using Terraform, with a focus on SSH key management, cloud-init automation, and least-privilege networking.
SSH Key Generation & Injection
Terraform programmatically generates and injects SSH keys using provider-specific methods while avoiding hardcoded secrets:
AWS Example (vm-aws-instance.tf)
| |
Cloud-Init Templating
Cloud-init configurations are dynamically populated using Terraform variables for cross-cloud consistency:
AWS Cloudflared Init (scripts/aws-cloudflared-init.yaml):
| |
Terraform Variable Injection:
This ensures secure secret handling while maintaining reusable templates.
Security Group/Firewall Rules
Zero-trust networking is enforced through provider-specific security configurations:
| Cloud | SSH Access | ICMP | Egress | Unique Feature |
|---|---|---|---|---|
| AWS | Restricted to user IP + Cloudflared SG | Allowed from user IP | Full outbound | Layered SG for tunnel/service separation |
| Azure | NSG rules limited to user IP | Restricted to user IP | Full outbound | Warp connector VM with custom init |
| GCP | Firewall rule with target tags | Restricted to user IP | Block SSH egress | Ephemeral instances via preemptible scheduling |
GCP Firewall Example (vm-gcp-instance.tf):
Critical Design Choice: All providers block default SSH access except from the user’s current IP and authorized tunnel components
Cross-Cloud Consistency
The implementation achieves security parity through:
- Centralized SSH Key Modules
- Dynamic Cloud-Init Templating
- IP Restriction Patterns
- Tag-Based Firewalling
This ensures identical security posture whether deploying to AWS, Azure, or GCP while respecting each provider’s native tooling.
Key Take-aways
- VMs are provisioned in AWS, Azure, and GCP with the necessary SSH keys and required agents/software installed at boot.
- This enables secure, automated access and management across all cloud environments.
Now let us dive into the Cloudflare module that powers the whole setup.
Cloudflare Module
This is the cloudflare module structure with terraform files being named to be self explanatory (I hope):
| |
If we have a look at cloudflared-tunnel-main.tf, the creation of the tunnel is straight forward:
| |
We retrieve the token for authentication so that it can be passed on to the VM to initiate the connection towards Cloudflare. Now that we’ve defined the tunnel, let’s see how authentication is handled.
As part of the SSH Access for Infrastructure use case, we need to generate a Cloudflare SSH Certificate Authority (CA) and this can be done (currently) only via API. I have integrated this API call in the Terraform code and store it into a “local” called gateway_ca_certificate that is, in turns, passed on to on output to be consumed elsewhere. This is very handy because we need this as part of the initialization script for the VM supporting the SSH Infrastructure Access use case.
| |
Then let see what the Infrastructure App looks like in Terraform since this is the most interesting use case here.
Infrastructure Access Application
First, we define the Target and the Application (type = “infrastructure”)
| |
We associate the target with var.gcp_vm_internal_ip which represents the private IP address of the GCP VM. Then we specify the port (22) and the protocol (SSH).
Once we have done the definition of Application, we need to define a policy to access it.
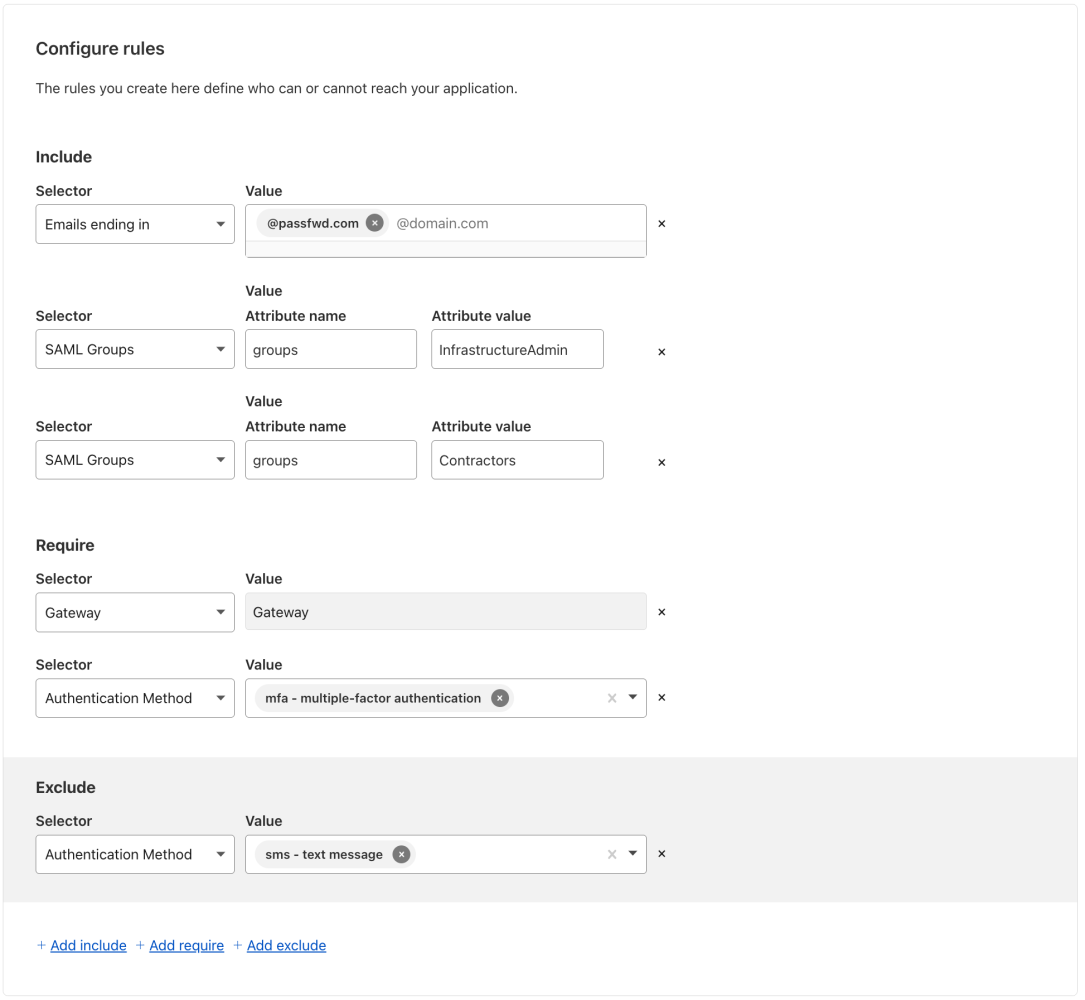
Policy Definition
This is how we define a policy for the Infrastructure application (“ssh-gcp-instance”).
- You will be able to access the app if you meet one of the following criteria (include block): (1) you belong to saml group okta_infrastructureadmin_saml_group_name or (2) you belong to saml group okta_contractors_saml_group_name or (3) you have an email associated with domain cf_email_domain.
- You will require (require block) to: (1) have the WARP Client in Gateway mode (device_posture = {integration_uid = var.cf_gateway_posture_id}) (2) use an authentication method including “MFA” (3) use an authentication method excluding “SMS”
The cf_email_domain is useful, especially if you have contractors which do not have a user definition in your Identity Provider (in this example Okta)
Finally you setup a connection_rule. In the example below, I allow users to ssh into the machine with their email prefix (e.g. my email is bob@macharpe.com , then I can login as “bob”)
N.B.: Cloudflare will not create new users on the target. UNIX users must already be present on the server (source )
| |
N.B.: there is currently a technical limitation, Infrastructure Access Application do not support “reusable policy” and therefore this policy is defined within the app definition.
Talking about a reusable policy (which can be applied to as many application as you want), here is an example of the Terraform definition of one (e.g. Salesforce Policy)
| |
In the particular policy we make use of “Rule Groups”: country_requirements_rule_group and latest_os_version_requirements_rule_group
The first one sets the location from which you can access the application (include) but also countries from which you may not login (exclude). Below is the code.
| |
Key Take-aways
- The Cloudflare module manages Zero Trust tunnels, device profiles, DNS records, policies, and short-lived SSH CA certificates via Terraform.
- Infrastructure Access Applications are defined for secure SSH access, with policies enforcing group membership, device posture, and MFA.
- Policies can be application-specific or reusable (e.g., for Salesforce), and leverage rule groups for granular access control (such as country or OS version restrictions.
One thing needs a bit more explanation here is how do we programmatically defined the routes in the WARP client so that connections to workloads are routed through Cloudflare, not locally? This is what the warp-routing module is designed for.
warp-routing module
The warp-routing module is probably the smartest one of the setup. Essentially, it consists of 3 python scripts:
These scripts were inspired by Cloudflare documentation itself (source ), there is a tool to calculate which subnets to exclude.
- The script gets a Private Subnet (e.g. 10.156.70.0/24) as an input.
- The script infers the corresponding RFC1918 subnet to which the input belongs (e.g. 10.156.70.0/24 belongs to 10.0.0.0/8)
- The script calculates all the subnets belonging to the base_network (e.g. 10.0.0.0/8) but excluding the subnet that we have as an input (e.g. 10.156.70.0/24)
This will turn out to be very useful to programmatically update the routes of the WARP clients to make sure that this subnet (e.g. 10.156.70.0/24) is not routed locally but instead sent to Cloudflare so it can eventually reach the VM.
N.B: by default Cloudflare exclude all RFC1918 networks from being routed through the WARP Client.
Here is a snippet of the output file generated in json format:
| |
warp_routing_subnets_calculation.tf
In Terraform, I execute the script and I, then, declare a resource “local_file” that I will be able to reuse elsewhere. This is the terraform file warp_routing_subnets_calculation.tf calling these scripts (example for AWS):
| |
Now that we have generated the json file, let’s see how we are making use of it to define custom device profiles
device-profiles.tf
In the device-profiles.tf located in module/cloudflare, we need to
- Read the default_profile so that we can retrieve the default excluded routers
- Define where the json generated files are located
- Ensure that the Terraform does not intend to read them before the scripts have run (this is done via: depends_on = [var.cf_aws/gcp/azure_json_subnet_generation])
| |
Once that’s done we define a local {} which is going to build the final_exclude_routes which is going to:
- Exclude all default RFC1918 subnets which have been infered by the script
- Include all the routes in these RFC1918 subnets except the ones to which the different VMs belong to.
This is achieved via for loops and here is the final_exclude_routes.
Now that we have the final_exclude_routes, we can use it in the definition of custom device profiles as per the below example (I have purposefully remove some part of the definition for readability
| |
In the exclude section we use a for loop to circle through the final_exclude_routes
N.B.1: you have noted that the support_url is equal to “Zero-TrustDemo-LaptopProfile”. This is very handy to check which profile is applied to your device (I used the tip shared here ).
Essentially you can issue “warp-cli settings support-url” to know which profile is being applied (example below on my local laptop)
N.B.2: To set the precedence, I have used a random integer between 0 and 99 to ensure that these profiles will super-seed whatever custom device profil was created
Once you have run the Terraform code, you will see 3 new device profiles under Settings > Warp Client > Device Settings:

And you can look at the Split Tunnels section > Exclude IPs and domains > Manage to see the results
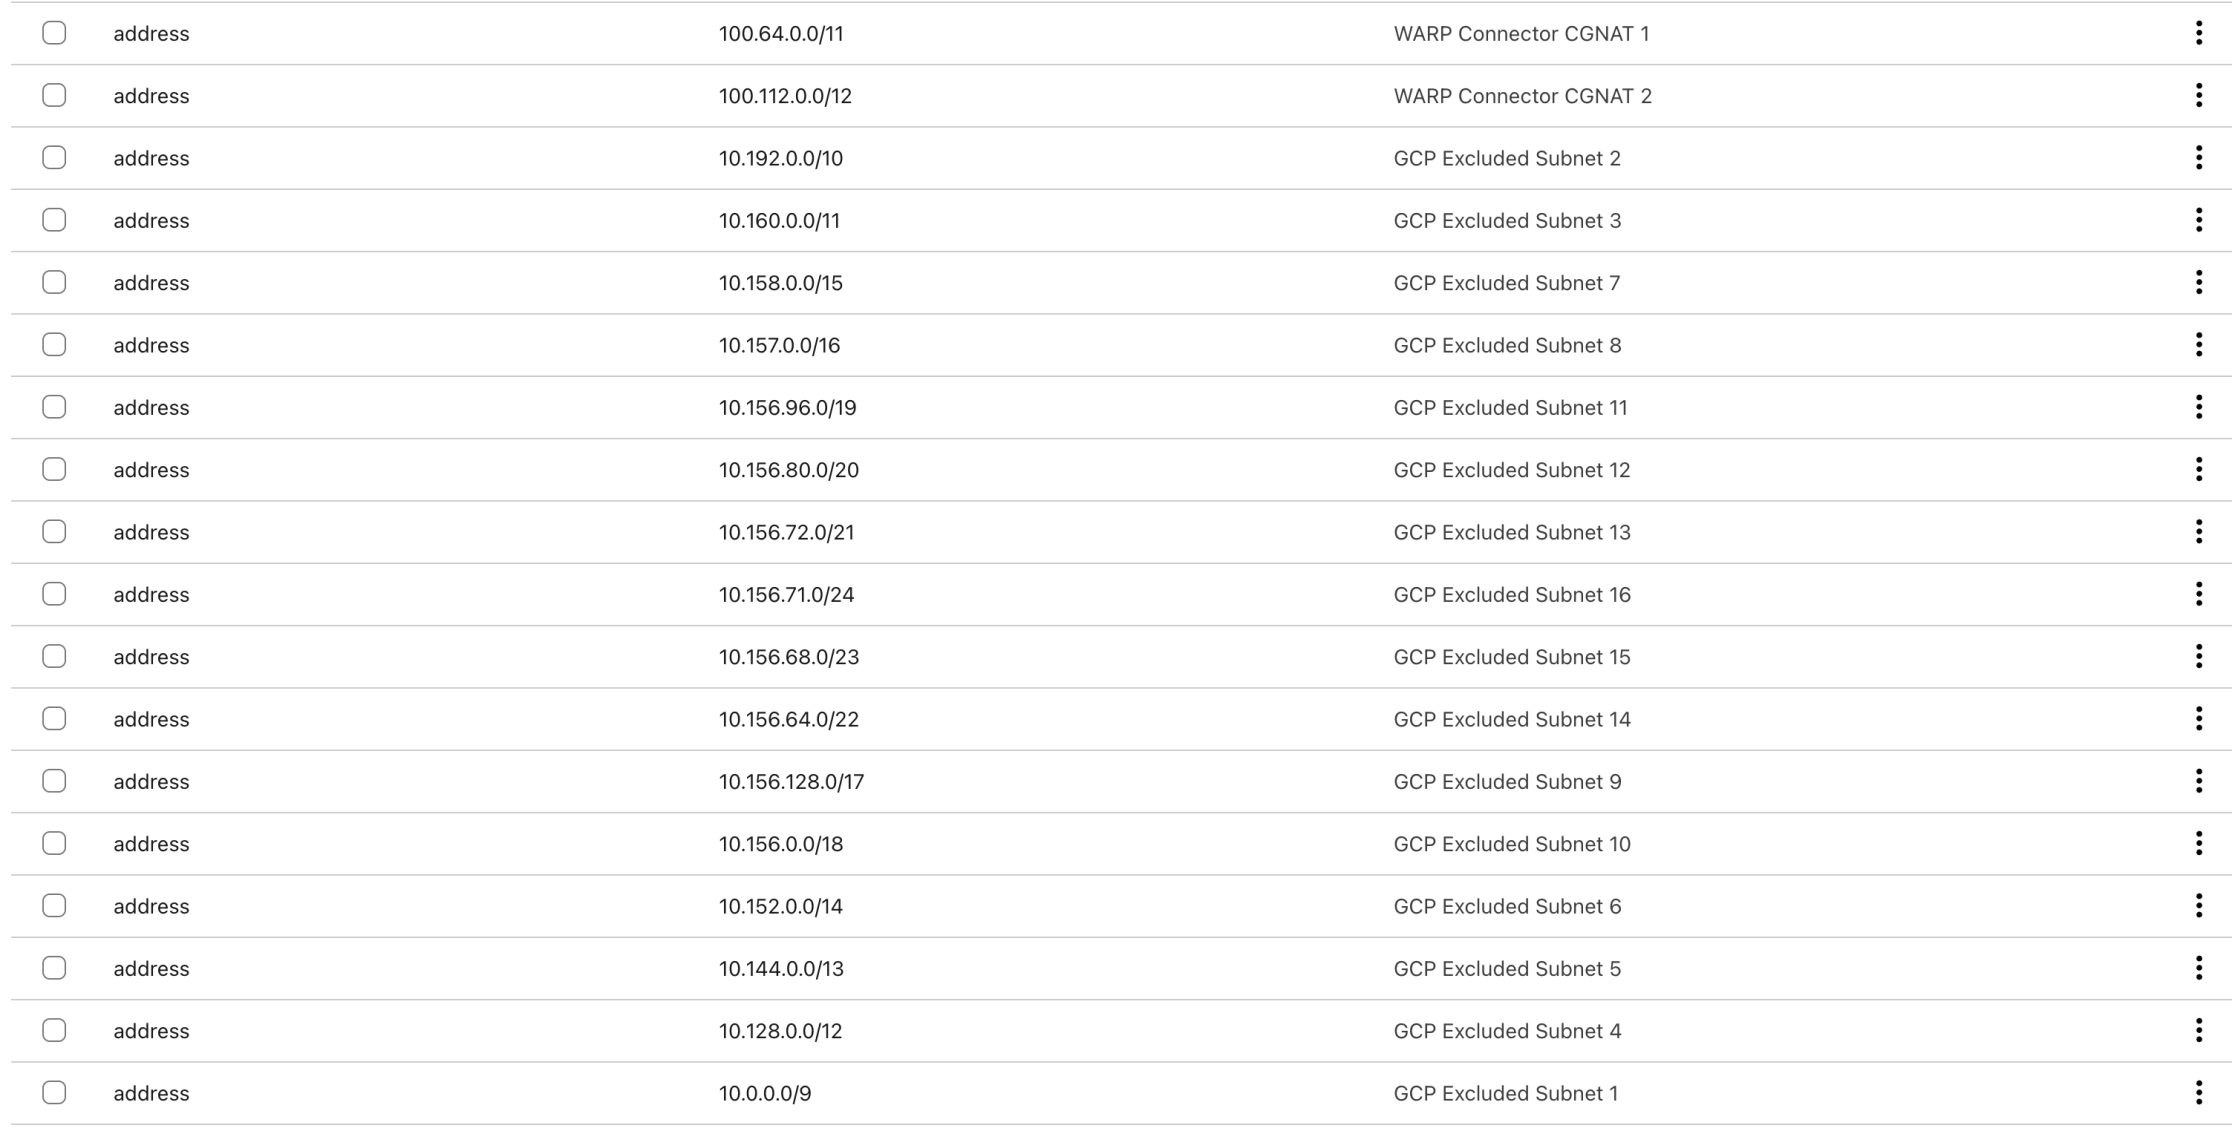
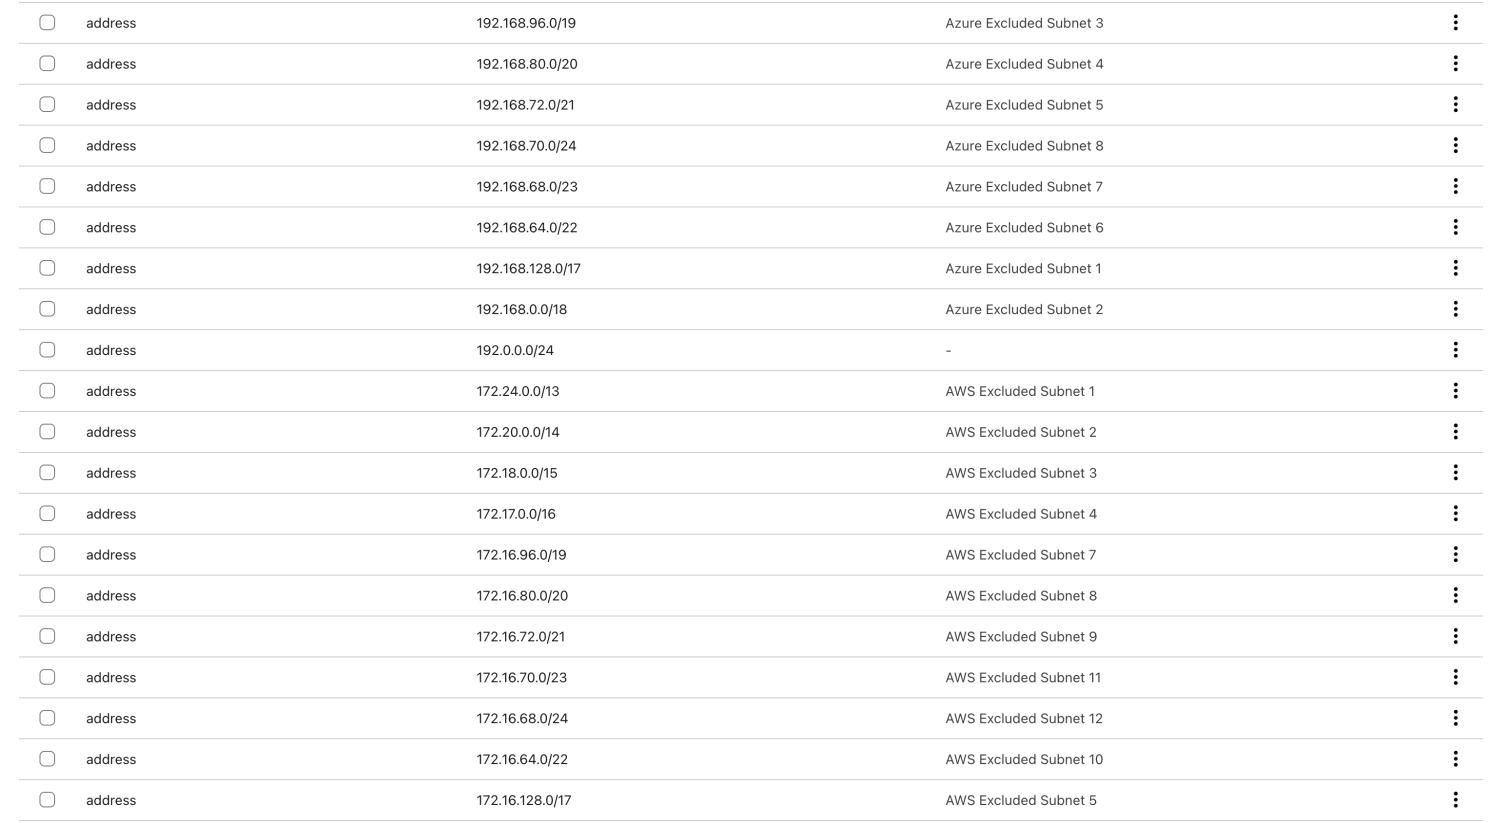
Key Take-aways
- The warp-routing module uses Python scripts to dynamically calculate subnet exclusions for each cloud, ensuring only desired private IP ranges are routed through Cloudflare WARP.
- This allows programmatic, accurate split-tunneling configuration, improving security and connectivity.
- Device profiles are created in Terraform to enforce these routing rules, with precedence set to ensure they override other profiles.
We have covered quite a bit of ground so far, let us see what it looks like in action.
In Action
This is a video showing the full terraform apply and some screenshots


Final Output
This is what the final output looks like. It makes it easy to ssh into the different workloads. Plus it gives you some information about the tunnel status and version.
| |
Conclusion
This project demonstrates how to build a production-ready Zero Trust environment across multiple clouds using Terraform. Key takeaways:
- Security First Least privilege access + short-lived credentials + MFA enforcement
- Modularity Wins Provider-specific modules enable easy cross-cloud expansion
- Documentation Matters Clear architecture diagrams and variable descriptions accelerated onboarding
- Automate Everything Cloud-init scripts and Terraform modules reduced manual configuration errors
The complete codebase and documentation are available in the project repository. For a hands-on demo, deploy the environment using the provided terraform.tfvars.example as a template.
Lessons Learned
- Multi-Cloud Complexity Maintaining consistent security policies across AWS/Azure/GCP required careful coordination of security group rules and IAM roles.
- Zero Trust Tradeoffs While Cloudflare’s device posture checks add security, they introduced initial complexity in tunnel token management.
- Terraform Limitations Azure Warp Connector required manual UI setup due to Terraform provider limitations, highlighting the importance of hybrid automation approaches.
- Testing Challenges Implementing terraform apply rollbacks for failed multi-cloud deployments required careful state file management.
Technical challenges
- I am still facing some technical challenges with the custom device profile resource in Terraform, probably due to Cloudflare API. Below is the error I get when I “terraform apply” for the second time. It looks close to this and this .
| |
- I have not found a way to retrieve the CGNAT (Carried-Grade NAT) IP assigned to WARP Client when you have enable Override local interface IP in Cloudflare UI.
- I am still facing challenges while using Microsoft Azure API (specifically while destroying the setup: terraform destroy).
- There is currently no terraform resource to create a WARP Connector tunnel which is expected as this is in beta.
Roadmap
- Use the Entra ID integration
- Use case for WARP Connector (Site-to-Site, Site-to-Internet…) link to the documentation
- SaaS Application in Cloudflare Access managed by Terraform
- Observability use case with Datadog
What’s Next
Looking ahead, Part 3 will explore advanced use cases you can demonstrate with this environment.
👉 Follow me on GitHub to get notified when I release the code: https://github.com/macharpe
This isn’t just a demo-it’s a blueprint for modern security. Stay tuned to transform your Zero Trust strategy from concept to reality. 🔒
This is Part 2 of a 3-part series on building scalable Zero Trust demo environments.